Manage connector models and templates
Connector models and templates are how a provider captures configuration once and reuses it across many customers. A connector model is a single connector blueprint. A customer template or location template is a larger snapshot that captures whole sets of locations, connectors, and access policies so they can be redeployed elsewhere. Use models for consistency; use templates to accelerate onboarding.
For the distinction, see Templates in Key concepts.
Connector models
A connector model is a reusable connector blueprint: a connector type plus the applications it hosts. Models standardize how applications and services are accessed across your deployments, so connectors stay consistent, deploy in seconds, and codify your security best practices.
Create a model
-
Sign in to the Customer Connect console. Service provider admins land on the provider dashboard; customer admins land on their own scoped dashboard.
-
Go to Connector models and click Add Model. This opens a full-page form (not a dialog).
-
Fill out the model's fields:
- Name: A descriptive label for the model, such as "Office Gateway" or "Plant Workstation".
- Type: How connectors built from this model reach their applications:
- Device: Runs on a device to host its local services.
- Gateway: Acts as a network gateway for subnet access.
- SDK Embedded: Embedded directly in an application.
- Description (optional): A note about what the model is for.
-
Under Hosted Applications, click Add Application and define each application: its type, name, protocol, and the listen/forward addresses and ports it reaches.
In fields marked with the variable glyph, type
{{to insert a variable. Variables are placeholders like{{customer.custom.dns_suffix}}, filled in per customer or location when the model is deployed. For more info, see Manage custom variables. -
Click Save Model.

Any connector created from this model inherits its applications; custom applications can still be added on top per connector.
Create models for common scenarios, like "Standard Office" or "IoT Sensor", to streamline customer onboarding.
Edit or delete
Open a model to edit its name, description, or applications. Edits propagate to every connector currently attached to the model. A model's Type is locked after creation: on edit the type is shown with a Locked badge and can't be changed (the same way a connector's type locks).
Deleting a model that's in use shows an impact confirmation listing where it's used. Deleting it removes the applications it contributed from every connector attached to it — the connectors themselves, and any applications added directly to them, are untouched.
A connector's model attachment isn't fixed for life: it can be attached, switched to another model of the same type, or
detached on a live connector through the API, by sending connectorModelId to PUT / PATCH /connectors/{id} (a uuid to
attach or switch, null to detach). Any of the three clears every application on the connector — including any added
directly to it — and materializes the incoming model's in their place, or none at all on a detach. See
Attaching a model for the full rules.
Customer templates
A customer template is a snapshot of a full customer setup (locations, connectors, and access policies) that you can apply when creating a new customer.
Save an existing customer as a template
You can start a customer template two ways; both open the same Save as Customer Template builder.
From the Templates page
- Go to Templates in the sidebar and open the Customer tab.
- Click Create Template.
- In the Create customer template dialog, select the customer to base the template on, then click Configure template.
From the Customers list
Go to Customers, find the customer's row, open the ⋮ (more actions) menu at the far right, and select Save as Template.
Build and save the template
Both entry points land on the same two screens:
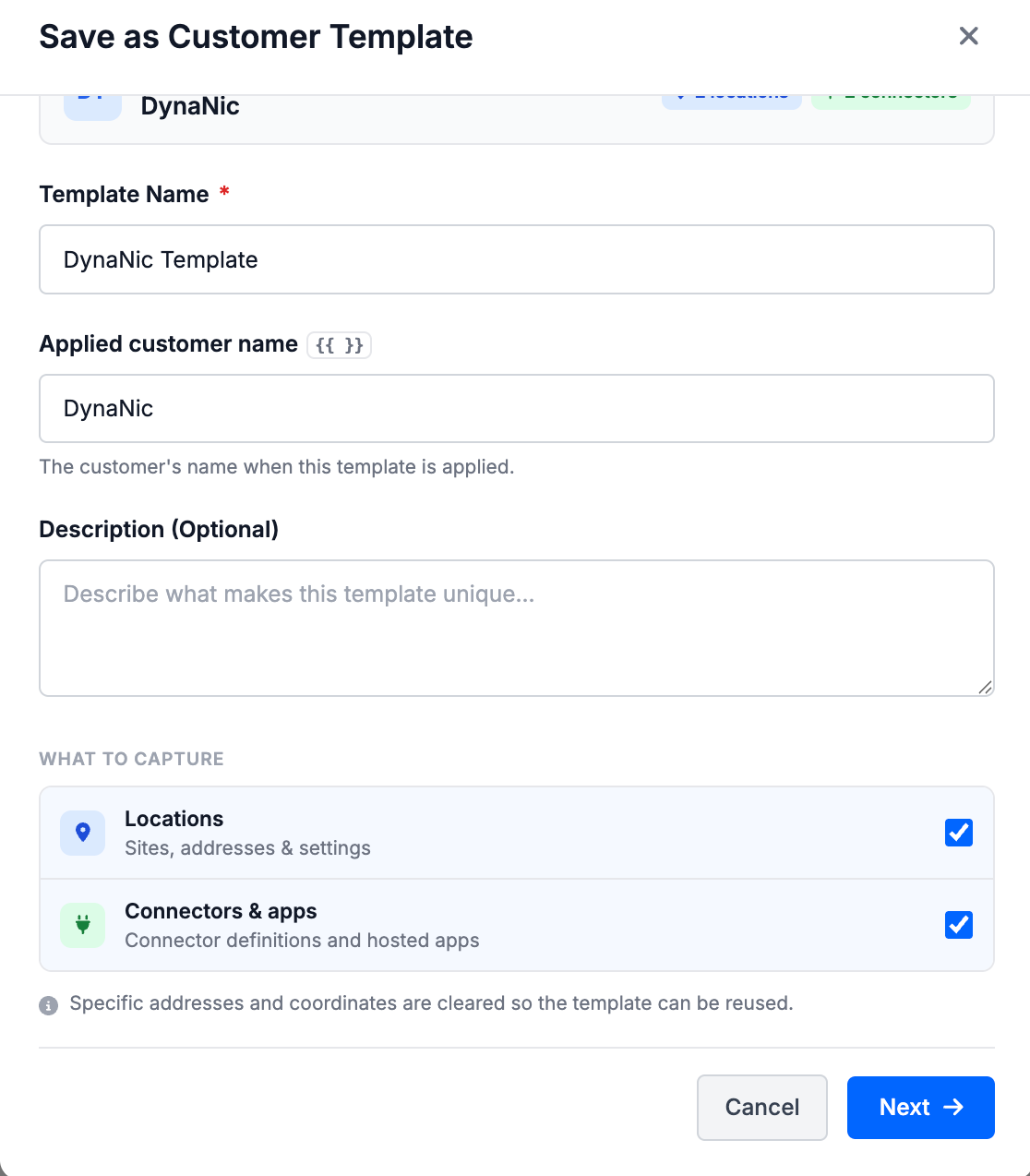
- In Save as Customer Template, enter a Template Name, set the Applied customer name (the customer's name when the template is applied), and add an optional description.
- Under What to capture, keep or clear Locations and Connectors & apps. Specific addresses and coordinates are cleared so the template can be reused.
- Click Next.
- On Review & save, rename or exclude any location-template rows.
- Click Save.
The template captures the customer's locations, connectors, access policies, and branding as a reusable blueprint.
Create a new customer from a template
When creating a new customer, choose the template option and pick a template. The new customer is pre-populated with the template's locations, connectors, and access policies, which you can edit before deploying.
Templates are a starting point, not a link. Editing the source customer later doesn't change existing templates, and editing a template doesn't change customers already deployed from it.
Location templates
A location template snapshots one location's configuration (its connectors, the applications they expose, and the access policies that involve them) so you can redeploy it at another customer or another site.
Apply a location template
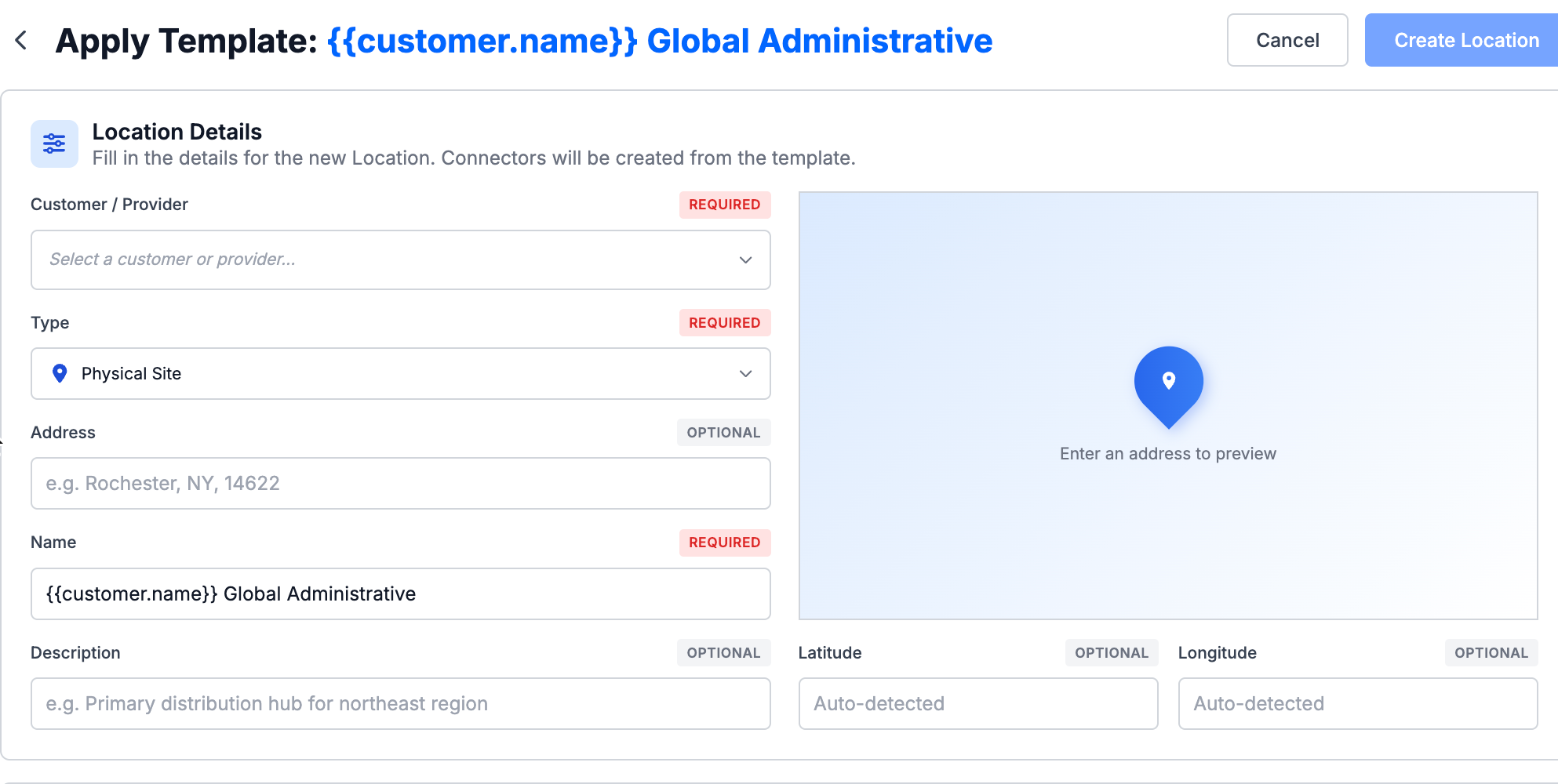
- On the Location tab, click Create Location on the template you want to apply. This opens the Apply Template wizard.
- Under Location Details, select the customer or provider to deploy into, then set the new location's Type, Name, and optional Address and Description.
- Review Connectors to Create — the connectors the template will create at the new location.
- Click Create Location.
Next steps
- Deploy and enroll a connector built from a model
- Onboard a customer from a template